


The success of a multimedia platform often depends on the quality of its content. Therefore, there are numerous tools for content management, such as manual or automatic moderation to identify offensive content, copyright infringements, or automatic/manual processing of uploaded content. One of the methods of automatically enhancing content is silence trimming.
The task of isolating voice or sounds is quite challenging. In this article, we will explain how we explored solutions for this challenge during the development of our projects, the BlaBlaPlay voice chat, and how to implement it in your iOS application.
[Theory] When do we need silence trimming?
For instance, you might have an audio file with segments where the volume is too low for human perception. In such cases, you may want to remove these segments from the file. Or, when recording an audio message, you might have some silent moments in the beginning while gathering your thoughts. To avoid rewinding through several seconds of silence repeatedly, it’s easier to trim them out. There are many similar cases, but the conclusion is the same—silence trimming improves the content and its perception quality.
We can implement it in different ways using various tools. Initially, we can identify two main groups of tools:
1. Manual removal—any audio editor has a basic function to select a segment for deletion or retention.
2. Automatic removal—these tools use auxiliary technologies to achieve the desired result. Let’s explore them in more detail.
[Theory] Automatic methods of silence detection
There are various methods, and the choice depends on the specific task faced by the developer. This is mainly because some tools allow isolating only the voice from the audio stream, while others work with both voice and background noises.
Detection based on sound level
Detection based on the sound level, or more precisely, its value, is the simplest and quickest method to implement. Therefore, it can be used for real-time audio streaming to identify silence. However, it is also the least accurate and fragile method of silence detection. The technology is straightforward:
1. Set a constant value in decibels, approximately equal to the threshold of human audibility.
2. Anything below this threshold is automatically considered silence and subject to trimming.
This method is suitable only when we need to identify absolute silence, and there’s no need to detect voice or any other background noises. Since absolute silence is rare, this method is not quite effective. Consequently, we can only use it for indicating the presence or absence of sound, not for processing silence.
Isolating voice from the audio stream
This approach works the opposite way—if there is speech, there is no silence.
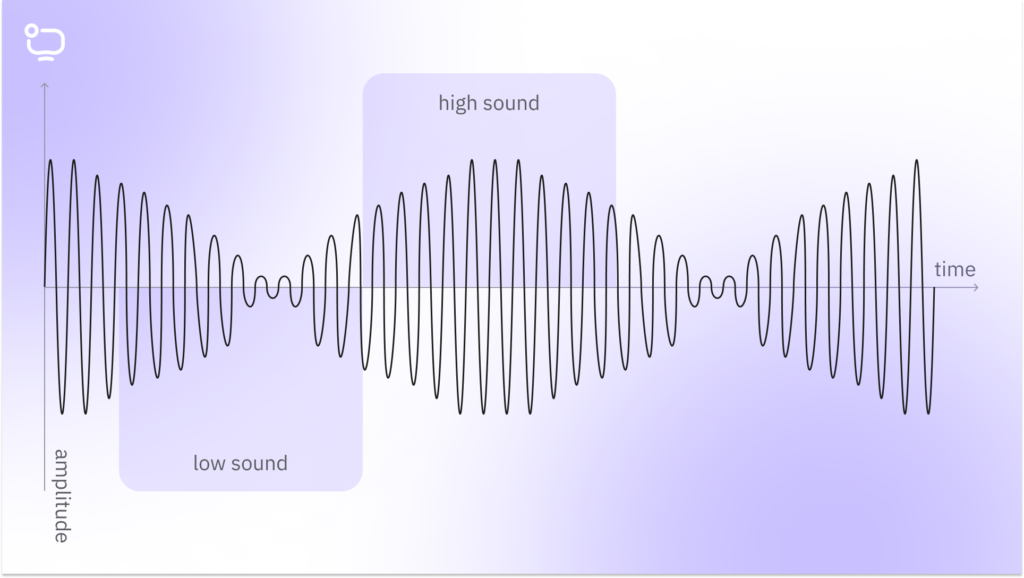
Extracting sound from an audio stream is a non-trivial task and we can achieve it by evaluating the fragment’s sound levels or its spectrogram—a plot of sound level oscillations. There are two approaches to evaluation: analytical- and neural network-based. In our application, we used a Voice Activity Detector (VAD)—a speech detector to isolate voice from noise or silence. Let’s consider it as an example.
Analytical approach
When working with speech signals, frequency-time domain processing is usually employed. Among the main methods are:
- Analysis using wavelet transformation.
- Analysis using linear prediction.
- Analysis using the Hilbert-Huang transform.
- Analysis using the Fourier transform.
- Analysis using the correlation function.
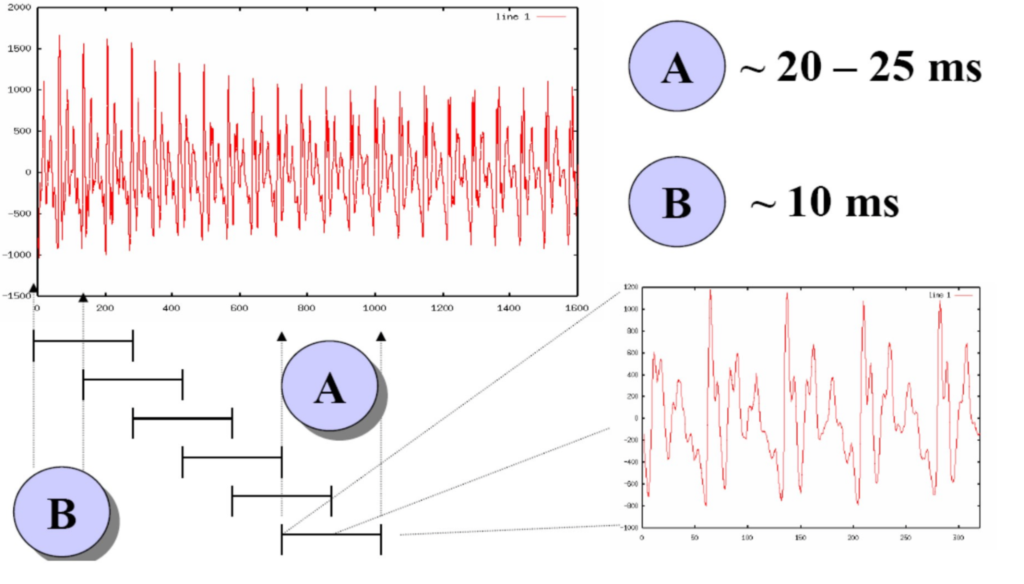
The most effective method for voice extraction relies on the fact that the human speech apparatus can generate specific frequency bands known as “formants.” In this method, the input data consists of a continuous oscillogram (a curve representing oscillations) of the sound wave. To extract speech, it is divided into frames—sound stream fragments with durations ranging from 10 to 20 ms, with a 10 ms step. This size corresponds to the speed of human speech: on average, a person pronounces three words in three seconds, with each word having around four sounds, and each sound is divided into three stages. Each frame is transformed independently and subjected to feature extraction.
Next, for each window, a Fourier transformation is performed:
- Peaks are found.
- Based on their formal features, a decision is made: whether there is speech signal or not. For a more detailed process, refer to the work by Lee, 1983, “Automatic Speech Recognition.”
Neural Network Approach to the Assessment
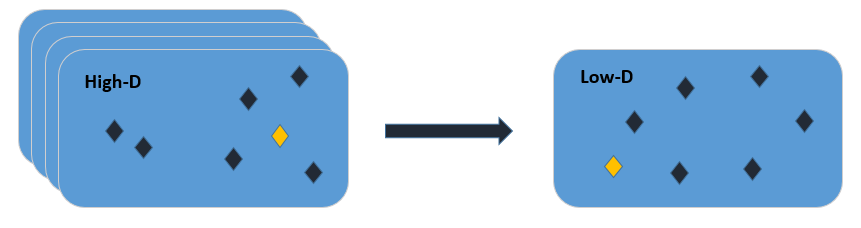
The neural network approach consists of two parts. The so-called feature extractor is a tool for extracting features and building a low-dimensional space. The input to the extractor is an oscillogram of a sound wave, and, for example, using Fourier transformation, its low-dimensional space is constructed. This means that key features are extracted from a large number of features and formed into a new space.
Next, the extractor organizes sounds in space so that similar ones are close together. For example, speech sounds will be grouped together but placed away from sounds of drums and cars.
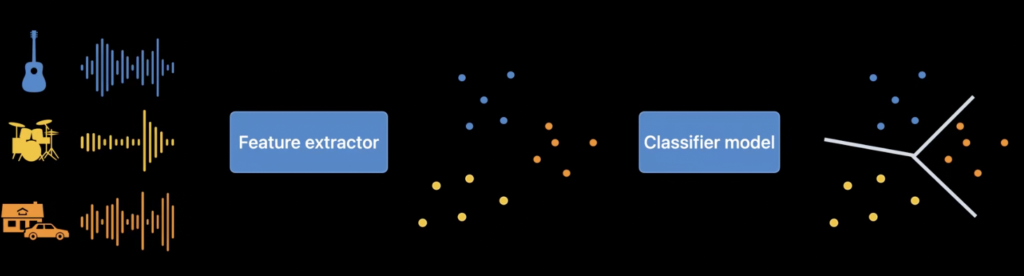
Then, a classification model takes the output data from the feature extractor and calculates the probability of speech among the obtained data.
What to use?
The process of extracting sounds or speech is complex and requires a lot of computational resources for fast operation. Let’s understand when and which method should be applied.
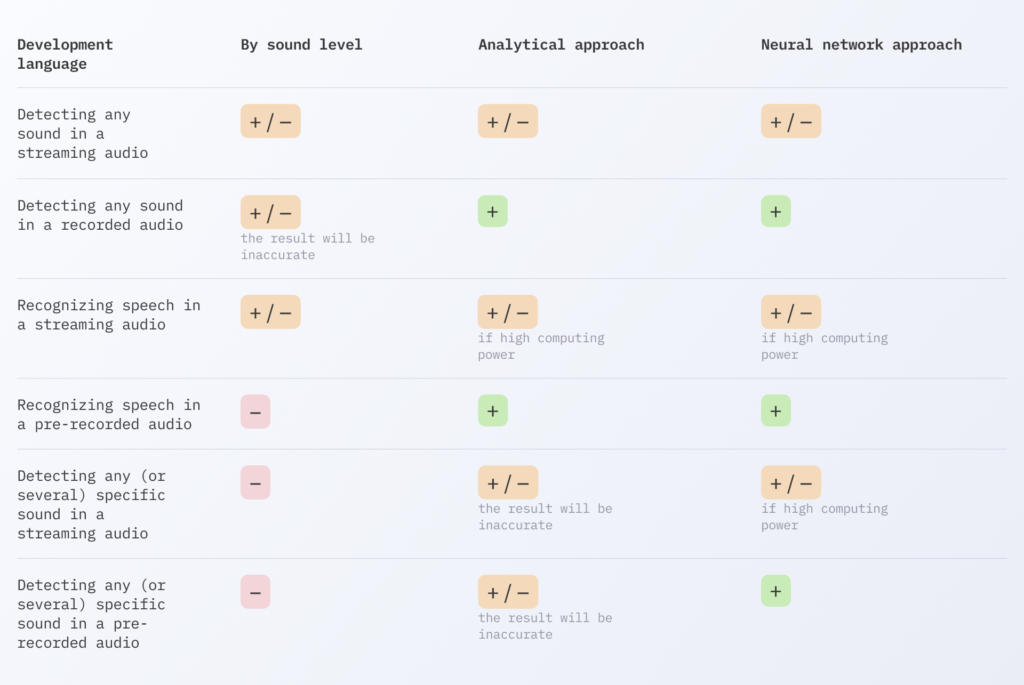
So, as we can see, signal-level detection won’t be suitable if you need accuracy. Both analytical and neural network approaches have their nuances. Both require high computational power, which limits their use with streaming audio. However, in the case of the analytical approach, this problem can be addressed by using simpler implementations at the cost of accuracy. For example, WebRTC_VAD may not be highly accurate, but it works quickly with streaming audio, even on low-powered devices.
On the other hand, if you have sufficient computational power and you want to detect not only speech but also sounds like birds, guitars, or anything else, a neural network will solve all your problems with high accuracy and within an acceptable time frame.
[Practice] Example for detecting and trimming silence in iOS audio recordings
All iPhones are sufficiently powerful, and Apple’s frameworks are optimized for these devices. Therefore, we can confidently use neural networks to detect silence in streaming audio, employing a reverse approach: where there are no sounds — there is silence. For detection, we will use the Sound Analysis framework, and for audio recording and trimming — AVFoundation.
Receiving and sending audio buffers during recording
First, we need to add a privacy request for using a microphone to info.plist.
<key>NSMicrophoneUsageDescription</key>
<string>This app uses the microphone to record audio</string>
To capture audio buffers from the audio recording stream, we need an AVAudioEngine object. And to deliver the received buffers, we need to add an observer to the output of the connected audio node.
Processing the buffer in the neural network and obtaining the result
The Sound Analysis framework comes with built-in recognition for 300 sounds, which is more than sufficient for our task. Let’s create a classifier class and properly configure the SNClassifySoundRequest object.
When creating the SNClassifySoundRequest, it is crucial to use a non-zero overlapFactor value when using a constant windowDuration. The overlapFactor determines how much the windows overlap during analysis, creating continuous context and coherence between the windows.
Next, we need a class of observer that conforms to the SNResultsObserving protocol. All classification results will be sent to this observer.
Once the observer is created, we can create the stream for analyzing incoming audio buffers—SNAudioStreamAnalyzer.
Now everything is ready. We can receive audio buffers and send them for analysis to the neural network, which is straightforward to do:
After the AVAudioPCMBuffer is successfully recognized, an event AudioClassificationEvent.result (SNClassificationResult) will be received in AudioClassifierObserver. audioClassificationEvent. It will contain all recognized sounds and their confidence levels. If there are no sounds, or their confidence is less than 0.75, we can consider that the sound was not recognized, and we can ignore the result. This can be determined as follows:
Trimming the audio file based on sound detection
Once the recording starts, and the first audio buffers are sent to the neural network for analysis, we need to start a timer. It will count the time until the first non-zero results appear. Note that the first results will not be obtained earlier than request?.windowDuration = CMTimeMakeWithSeconds (1.3, preferredTimescale: 44_100). So the initial timer values should take this into account.
When the first non-zero results appear, we stop the timer and, based on recordSilenceTime, we can trim a portion from the beginning of the audio recording.
File trimming is done using AVAssetExportSession.
Results and Conclusion
Detecting silence or sounds in audio recordings becomes more accessible for applications that are not primarily specialized in professional processing without sacrificing the efficiency and accuracy of the obtained results. Apple already provides ready-made tools for this, so there’s no need to spend a year or more developing such functionality manually. Love neural networks.
Check out how it works in our BlaBlaPlay app or contact us to implement the silence trimming feature in your iOS application.


.avif)

Comments