


Key takeaways
• Use Notification.CallStyle on Android 12+. It is the only call-notification template Google ranks as first-class; custom layouts and legacy heads-up builders are now fallbacks for API 26–30.
• Full-screen intents are now a policy surface. Android 14 makes USE_FULL_SCREEN_INTENT a special permission and Google Play auto-revokes it from apps that are not calling or alarm apps — always guard with canUseFullScreenIntent().
• Runtime notification permission is the silent churn killer. Android 13+ installs start with notifications off; apps that skip the POST_NOTIFICATIONS onboarding step lose 10–25% of inbound calls before the user ever sees them.
• A typed foreground service is non-negotiable. Android 14+ requires FOREGROUND_SERVICE_TYPE_PHONE_CALL with a 5-second startForeground() deadline — miss it and the OS throws ForegroundServiceDidNotStartInTimeException and the call is lost.
• OEM survival testing matters more than code. Xiaomi, Huawei, Oppo and Vivo kill background call services even when the code is correct; Fora Soft test matrices cover the top 5 OEMs before shipping a calling product.
Why Fora Soft wrote this playbook
Fora Soft has been shipping real-time video and audio products since 2005, and Android call notifications are a recurring source of fire drills. We see the same failure pattern across telemedicine, live-classroom, and enterprise-calling clients: the code works on the developer’s Pixel, then Samsung swallows the notification, Xiaomi kills the foreground service, and Google Play pulls USE_FULL_SCREEN_INTENT out from under the app because it is not registered as a dialer. The answer rate drops, reviews tank, and the engineering team spends a sprint on OEM quirks instead of features.
This guide is the checklist we give our own Android engineers when they onboard onto a call-heavy product. It folds in the BrainCert lessons (a WebRTC-first LMS with 100K+ customers and 500M+ classroom minutes), the ProVideoMeeting rollout (a WebRTC + FreeSWITCH conferencing platform that layers Zoom-style calls with in-call e-signature), and the lock-screen heuristics we hardened on MyOnCallDoc, a telemedicine product where a missed call is a missed clinic visit.
Every code snippet below has been compiled against Android 14 (API 34) and verified on Android 8.0 through 15. If you want the fast path — a working, policy-clean incoming-call notification stack — skim the key takeaways and jump straight to the CallStyle code below.
Building a calling app and worried about Android 14 compliance?
Book a 30-minute scoping call with our Android lead. We will sanity-check your notification stack, service types, and FSI posture against the current Play policy.
What a good Android call notification looks like in 2026
A production-grade incoming-call notification on Android has to survive six different runtime environments simultaneously: device awake in the foreground, device idle in the background, device locked, Do Not Disturb on, another call active, and the app killed by the OEM battery manager. WhatsApp, Telegram, Signal and Zoom each rebuild this stack the same way. The pattern is consistent.
The modern baseline has five ingredients. A dedicated IMPORTANCE_HIGH channel so the notification can heads-up. A Notification.CallStyle template so the OS paints it with the shared call UI. A Person object so the caller surfaces correctly in conversation filters and in Android Auto. A full-screen PendingIntent that fires an activity with setShowWhenLocked(true) and setTurnScreenOn(true) so the screen wakes. And a typed foreground service with phoneCall type so the OS does not kill it mid-ring.
Miss any one and the user experience collapses to a silent banner at the top of the screen that the user will never see in time. The bar is high because it matches what users already get from the dialer.
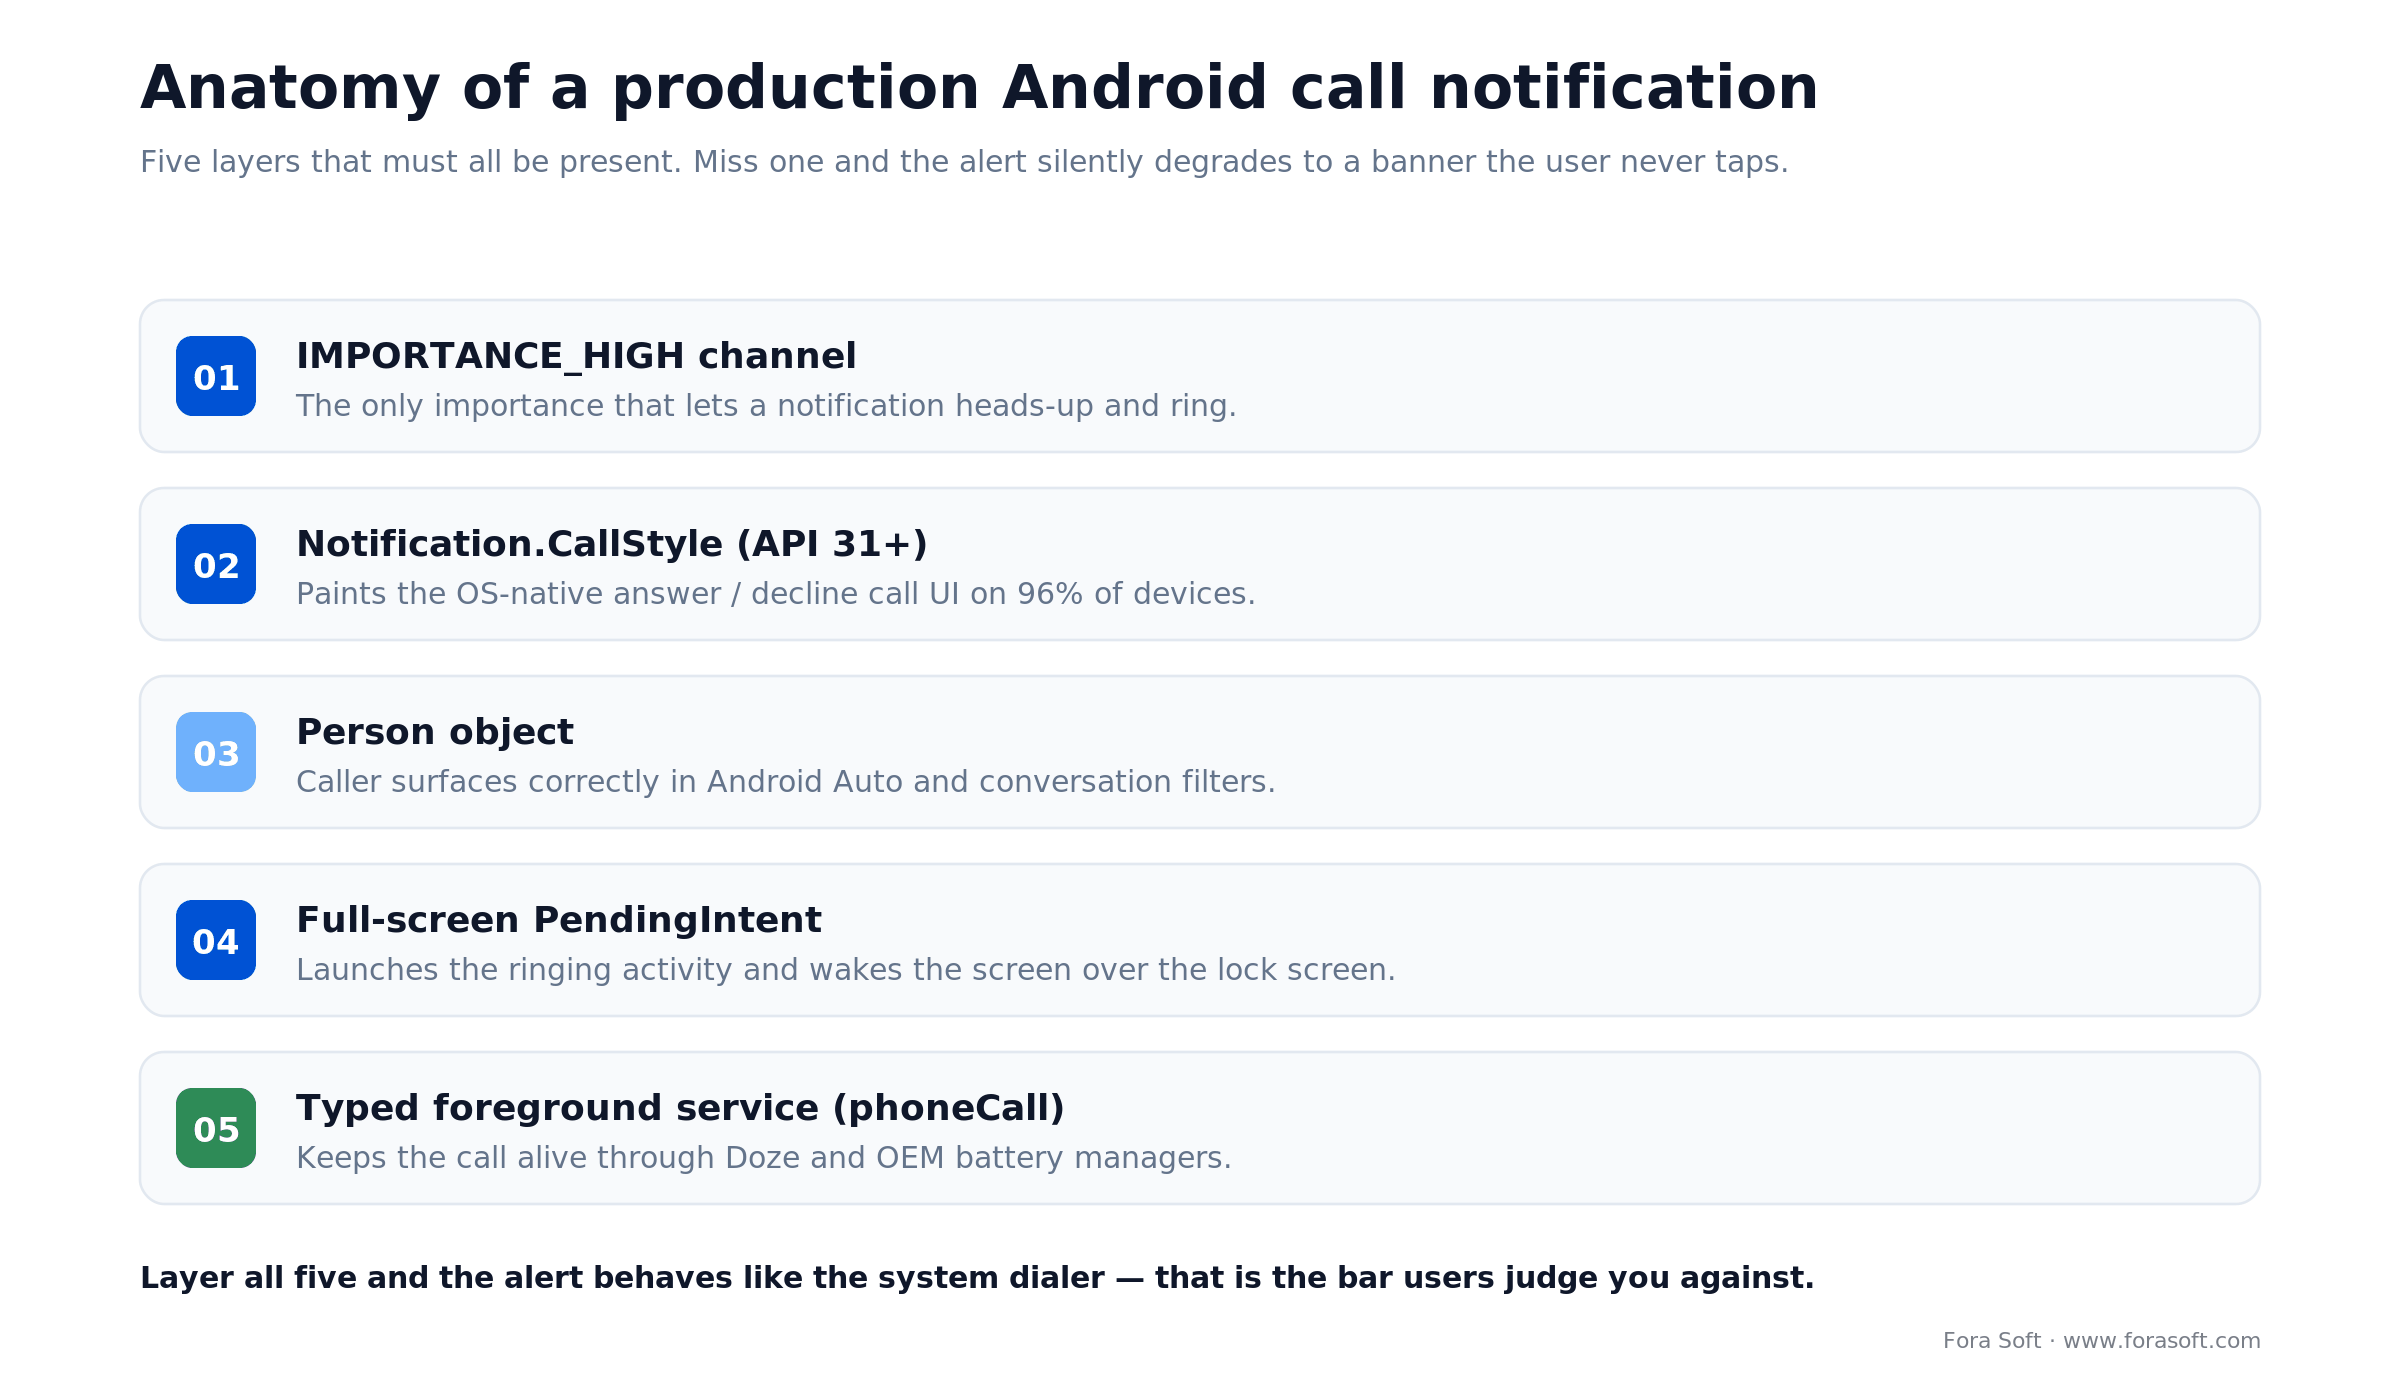
Figure 1. All five layers must be present — miss one and the alert degrades to a silent banner.
Android API changes that actually matter for calls
Android’s notification rules have been rewritten every year since 2017. The table below collapses the decade-long history into the five API levels that force behavior changes in your calling code. Anything older than API 26 is outside any modern Play Store baseline.
| API / Version | What changed | What you must add | Failure mode if ignored |
|---|---|---|---|
| API 26 — Android 8.0 | Notification channels mandatory. | A dedicated incoming_calls channel at IMPORTANCE_HIGH. |
Notifications silently dropped. |
| API 29 — Android 10 | Background starts restricted; full-screen intent becomes the only reliable wake path. | setFullScreenIntent() + setShowWhenLocked(). |
Call screen fails to launch from the background. |
| API 31 — Android 12 | Notification.CallStyle lands; trampolining banned; FLAG_IMMUTABLE required on all PendingIntents. |
Swap custom layouts for CallStyle.forIncomingCall(). |
App crashes on notify; call tap opens nothing. |
| API 33 — Android 13 | POST_NOTIFICATIONS becomes a runtime permission, off by default. |
Permission request in onboarding, with rationale. | Silent install, zero notifications, high churn. |
| API 34 — Android 14 | USE_FULL_SCREEN_INTENT becomes special-access; typed foreground services enforced; Play auto-revokes FSI from non-calling apps (in force since Jan 2025). |
Declare foregroundServiceType="phoneCall"; call canUseFullScreenIntent(). |
ForegroundServiceDidNotStartInTimeException; Play Store takedown. |
The practical minSdk for a calling product in 2026 is API 26. Per Statcounter data (April 2026, via apilevels.com), ~96% of active devices run API 26 or newer, ~87% are on API 30+, and ~69% are already on API 33+ (Android 13+). That means every CallStyle branch still needs a legacy fallback — but the fallback should be an exception path, not your default.

Figure 2. A minSdk of 26 still reaches ~96% of active devices; CallStyle (API 31+) covers ~79%. Source: Statcounter, April 2026.
Permissions and manifest entries you will need
Before any code runs, the manifest has to declare every permission the OS checks at install and at runtime. Missing one of these is the top cause of “works on my device” bugs. Copy this block into AndroidManifest.xml and delete only what you are absolutely sure you do not need.
<uses-permission android:name="android.permission.POST_NOTIFICATIONS" />
<uses-permission android:name="android.permission.USE_FULL_SCREEN_INTENT" />
<uses-permission android:name="android.permission.FOREGROUND_SERVICE" />
<uses-permission android:name="android.permission.FOREGROUND_SERVICE_PHONE_CALL" />
<uses-permission android:name="android.permission.WAKE_LOCK" />
<uses-permission android:name="android.permission.RECORD_AUDIO" />
<uses-permission android:name="android.permission.MODIFY_AUDIO_SETTINGS" />

<service
    android:name=".CallService"
    android:exported="false"
    android:foregroundServiceType="phoneCall" />

<activity
    android:name=".IncomingCallActivity"
    android:exported="false"
    android:launchMode="singleInstance"
    android:showWhenLocked="true"
    android:turnScreenOn="true" />
Reach for FOREGROUND_SERVICE_PHONE_CALL when: your target is API 34+ and you need the service alive through the ring–answer–hangup cycle. Targeting lower API levels still works without the typed permission, but do not skip the manifest entry or the compliance check will fail at upload.
The android:showWhenLocked and android:turnScreenOn attributes on IncomingCallActivity are what actually raise the activity above the keyguard. Setting them in code via setShowWhenLocked(true) also works; declaring them statically in the manifest is more reliable on aggressive OEMs because it avoids a race between onCreate and the window’s first draw.
Requesting POST_NOTIFICATIONS without losing the user
Android 13 made notifications opt-in. For a calling app that is a ten-to-twenty-five-percent reduction in answered calls if you ship the default prompt blind. The right pattern is to defer the ask until the user has experienced one moment of value — signed up, added a contact, joined their first room — and then explain why the permission matters before the system dialog fires.
private val requestPermissionLauncher = registerForActivityResult(
    ActivityResultContracts.RequestPermission()
) { granted ->
    if (granted) analytics.log("notifications_granted")
    else ui.showSoftWall() // non-blocking banner, retry later
}

fun askForNotifications() {
    if (Build.VERSION.SDK_INT < Build.VERSION_CODES.TIRAMISU) return
    val perm = Manifest.permission.POST_NOTIFICATIONS
    when {
        ContextCompat.checkSelfPermission(this, perm) == PERMISSION_GRANTED -> return
        shouldShowRequestPermissionRationale(perm) -> ui.showRationaleBottomSheet(
            onAccept = { requestPermissionLauncher.launch(perm) }
        )
        else -> requestPermissionLauncher.launch(perm)
    }
}
Two details to watch. First, shouldShowRequestPermissionRationale returns false the first time you ask, which is counter-intuitive; always fall through to the system dialog on first run. Second, if the user denies twice, Android stops showing the dialog entirely; your only path is a soft wall that deep-links into app settings with Settings.ACTION_APP_NOTIFICATION_SETTINGS.
Creating the incoming-calls notification channel
Call notifications live in their own channel at IMPORTANCE_HIGH. Anything lower and the OS refuses to heads-up, even if your payload is perfect. Mark it as important enough to bypass Do Not Disturb when the user is in a verified call relationship by setting CATEGORY_CALL on the notification itself (not the channel).
const val INCOMING_CALL_CHANNEL_ID = "incoming_calls"

fun ensureChannel(ctx: Context) {
    val channel = NotificationChannelCompat.Builder(
        INCOMING_CALL_CHANNEL_ID,
        NotificationManagerCompat.IMPORTANCE_HIGH
    )
        .setName("Incoming calls")
        .setDescription("Audio and video call alerts")
        .setVibrationEnabled(true)
        .setLightsEnabled(true)
        .setSound(null, null)          // app plays the ring, not the channel
        .build()
    NotificationManagerCompat.from(ctx).createNotificationChannel(channel)
}
Why we suppress the channel sound
CallStyle does not play any audio on its own. For a call you play the ringtone yourself with MediaPlayer or Ringtone using USAGE_NOTIFICATION_COMMUNICATION_REQUEST, so you control looping and audio routing. If the channel plays a sound too, you get double audio and Bluetooth headsets route the wrong stream. Keep one source of truth.
Building the CallStyle notification (API 31+)
CallStyle is a template, not a style. Pass it a Person and two or three PendingIntents and the OS renders the familiar green-answer / red-decline buttons with per-OEM shading. Three variants exist: forIncomingCall, forOngoingCall, and forScreeningCall. Use the right one — Android Auto and Wear OS pick up on it.
fun buildIncomingCallNotification(
    ctx: Context,
    call: IncomingCall
): Notification {
    val caller = Person.Builder()
        .setName(call.displayName)
        .setIcon(IconCompat.createWithBitmap(call.avatar))
        .setImportant(true)
        .build()

    val answer = pendingIntent(ctx, AnswerReceiver::class.java, call.id, 10)
    val decline = pendingIntent(ctx, DeclineReceiver::class.java, call.id, 11)
    val fullScreen = pendingIntent(
        ctx, IncomingCallActivity::class.java, call.id, 12,
        flags = PendingIntent.FLAG_UPDATE_CURRENT or PendingIntent.FLAG_IMMUTABLE,
        activity = true
    )

    val builder = NotificationCompat.Builder(ctx, INCOMING_CALL_CHANNEL_ID)
        .setSmallIcon(R.drawable.ic_call_small)
        .setContentTitle(ctx.getString(R.string.incoming_call))
        .setContentText(call.displayName)
        .setLargeIcon(call.avatar)
        .setCategory(NotificationCompat.CATEGORY_CALL)
        .setOngoing(true)
        .setOnlyAlertOnce(true)
        .setStyle(NotificationCompat.CallStyle.forIncomingCall(caller, decline, answer))
        .addPerson(caller)

    val nm = ctx.getSystemService(NotificationManager::class.java)
    val canFsi = Build.VERSION.SDK_INT < Build.VERSION_CODES.UPSIDE_DOWN_CAKE
        || nm.canUseFullScreenIntent()
    if (canFsi) builder.setFullScreenIntent(fullScreen, true)

    return builder.build()
}
PendingIntent hygiene
Every PendingIntent must carry FLAG_IMMUTABLE on API 31+, and a unique requestCode so the OS does not collapse two calls into one intent. For the answer and decline buttons, favor a BroadcastReceiver over an Activity target — it runs in milliseconds and does not pull the user into the UI twice. Full-screen intent, however, must target an activity.
Full-screen intents after Android 14
Before Android 14, any app could set a full-screen intent and wake the screen. That is over. Google’s Play policy, enforced from 22 January 2025, revokes USE_FULL_SCREEN_INTENT from any app whose core function is not calling or alarms. The system does not throw; it silently downgrades your notification to a heads-up banner. The only reliable guard is to check before you use it.
Reach for full-screen intent when: your app is user-recognized as a caller (video conferencing, telemedicine, enterprise softphone) and losing a call costs real money. If your app is a general-purpose social app that occasionally hosts calls, do not request it — Play will auto-revoke.
fun canUseFullScreenIntent(ctx: Context): Boolean {
    if (Build.VERSION.SDK_INT < Build.VERSION_CODES.UPSIDE_DOWN_CAKE) return true
    val nm = ctx.getSystemService(NotificationManager::class.java)
    return nm.canUseFullScreenIntent()
}

fun launchFullScreenIntentSettings(ctx: Context) {
    val intent = Intent(Settings.ACTION_MANAGE_APP_USE_FULL_SCREEN_INTENT)
        .setData(Uri.fromParts("package", ctx.packageName, null))
    ctx.startActivity(intent)
}
When canUseFullScreenIntent() returns false, send the user to the settings screen with a short rationale. Do not spam the request; Google reserves the right to penalize apps that repeatedly nag.
The lock-screen activity that wakes the device
When the full-screen intent fires, it launches an activity. That activity is what your users actually see. The job of that activity is to show answer / decline buttons large enough for a half-awake user to tap, and to tear down cleanly whether the user answers, declines, times out, or the remote peer cancels first.
class IncomingCallActivity : AppCompatActivity() {

    override fun onCreate(savedInstanceState: Bundle?) {
        super.onCreate(savedInstanceState)

        if (Build.VERSION.SDK_INT >= Build.VERSION_CODES.O_MR1) {
            setShowWhenLocked(true)
            setTurnScreenOn(true)
            (getSystemService(KeyguardManager::class.java))
                ?.requestDismissKeyguard(this, null)
        } else {
            @Suppress("DEPRECATION")
            window.addFlags(
                WindowManager.LayoutParams.FLAG_SHOW_WHEN_LOCKED or
                WindowManager.LayoutParams.FLAG_TURN_SCREEN_ON or
                WindowManager.LayoutParams.FLAG_KEEP_SCREEN_ON
            )
        }

        setContentView(R.layout.activity_incoming_call)
        bindCallViewModel(intent.getStringExtra(EXTRA_CALL_ID))
    }

    override fun onNewIntent(intent: Intent) {
        super.onNewIntent(intent)
        if (intent.action == ACTION_END_CALL) finishAndRemoveTask()
    }
}
Dismissing the keyguard safely
requestDismissKeyguard only dismisses a non-secure keyguard. On devices with PIN, pattern, or biometric locks, the user must still authenticate with their PIN, pattern, or biometric to reach anything beyond the call screen itself. That is the correct security posture: the call UI shows, the user answers, and anything that requires sensitive data (contacts, chat history) stays behind the keyguard until they authenticate.
The typed foreground service that keeps the call alive
A call notification that is not anchored in a foreground service will be killed by any OEM battery manager inside of a minute. Android 14 takes this further: foreground services must be typed, and the phone-call type has its own dedicated permission. Miss the 5-second startForeground deadline and the OS throws ForegroundServiceDidNotStartInTimeException.
class CallService : Service() {

    override fun onBind(intent: Intent?): IBinder? = null

    override fun onStartCommand(intent: Intent?, flags: Int, startId: Int): Int {
        val call = intent?.toCall() ?: return START_NOT_STICKY

        val notification = buildIncomingCallNotification(this, call)
        if (Build.VERSION.SDK_INT >= Build.VERSION_CODES.UPSIDE_DOWN_CAKE) {
            ServiceCompat.startForeground(
                this, CALL_NOTIFICATION_ID, notification,
                ServiceInfo.FOREGROUND_SERVICE_TYPE_PHONE_CALL
            )
        } else {
            startForeground(CALL_NOTIFICATION_ID, notification)
        }
        return START_NOT_STICKY
    }

    // phoneCall FGS is NOT time-limited by the system (unlike shortService).
    // You own the ring timeout: cancel when your signaling server says so.
    fun onRingTimeout() {
        stopForeground(STOP_FOREGROUND_REMOVE)
        stopSelf()
    }
}
For deeper background-service scaffolding, including deep-link routing from your push layer, see our companion guide on foreground services and deep links on Android 14.
Your foreground service keeps crashing on Android 14?
Our Android team ships call-heavy products across dozens of OEMs every quarter. We can audit your service types, FCM fan-out, and OEM survival matrix in a focused call.
When you still need a custom-layout notification
CallStyle is the right default for 90% of apps. Custom RemoteViews layouts are still worth the cost in three narrow cases: you are targeting API 26–30 and CallStyle does not exist; your brand system requires colors or typography that the OEM template overrides; or you need a notification element CallStyle does not expose (a secondary line of metadata, a brand mark, a third action).
Reach for RemoteViews when: the UX team will not accept OEM accent colors and the product risk of looking like every other caller is high. Budget for a 2-device-lab pass (Samsung One UI, Xiaomi HyperOS) because those two vendors override notification rendering most aggressively.
val remote = RemoteViews(packageName, R.layout.notification_incoming_call)
remote.setTextViewText(R.id.caller_name, call.displayName)
remote.setOnClickPendingIntent(R.id.btn_accept, answer)
remote.setOnClickPendingIntent(R.id.btn_decline, decline)

val notif = NotificationCompat.Builder(ctx, INCOMING_CALL_CHANNEL_ID)
    .setSmallIcon(R.drawable.ic_call_small)
    .setStyle(NotificationCompat.DecoratedCustomViewStyle())
    .setCustomContentView(remote)
    .setCustomBigContentView(remote)
    .setCustomHeadsUpContentView(remote)
    .setCategory(NotificationCompat.CATEGORY_CALL)
    .setOngoing(true)
    .build()
RemoteViews does not understand ConstraintLayout, data binding, or any custom view. Use LinearLayout or RelativeLayout, keep the view hierarchy under six elements, and wire every click through setOnClickPendingIntent.
CallStyle vs ConnectionService — which abstraction
CallStyle is a notification template. ConnectionService is a system telecom integration. They solve different problems and are often combined in production calling apps.
| Dimension | Notification.CallStyle | ConnectionService + Telecom |
|---|---|---|
| Min API | 31 | 23, production-stable from 26 |
| Integration scope | In-app notification | System call log, Android Auto, Bluetooth HFP, Wear OS |
| Native UI | Heads-up banner + system buttons | Full dialer-class screen with audio routing |
| Effort | 1–3 dev-days | 2–3 dev-weeks, plus OEM testing |
| When to pick | Most social, enterprise, telemedicine apps | Dialer replacements, softphones, Auto-first products |
For WebRTC apps, CallStyle covers the incoming-call experience entirely. If your product needs to register in the system dialer, show up in the native call log, or hand off audio routing to Android Auto without your UI on top, layer ConnectionService on top. Most Fora Soft clients ship CallStyle first and add ConnectionService only after validating demand on connected devices.

Figure 3. Ship CallStyle first; add ConnectionService only for dialer-class integration.
The wake chain: from FCM to ringing screen in under 2 seconds
Users judge calling apps on how quickly the phone lights up. Industry-leading apps hit <1.5s from the remote peer pressing call to the screen waking. That is not one optimization; it is a chain of five stages, each with a hard latency budget.
1. Signal delivery. Use a high-priority FCM data message, not a notification message. Notification messages are dropped into the system tray and can be delayed by Doze; high-priority data messages wake the app immediately. Budget: 200–800 ms.
2. Service start. FCM onMessageReceived calls ContextCompat.startForegroundService on your typed CallService. The service has 5 seconds on API 34 to call startForeground. Budget: 300 ms.
3. Notification post. Build the CallStyle notification and call startForeground. Budget: 50 ms.
4. Full-screen trigger. If canUseFullScreenIntent() returns true, the OS launches IncomingCallActivity. Budget: 150 ms.
5. Screen wake. setTurnScreenOn(true) + setShowWhenLocked(true). Budget: 300 ms.
Anything over 2 seconds and users will think the call came late. Anything over 4 seconds and they start ignoring calls.
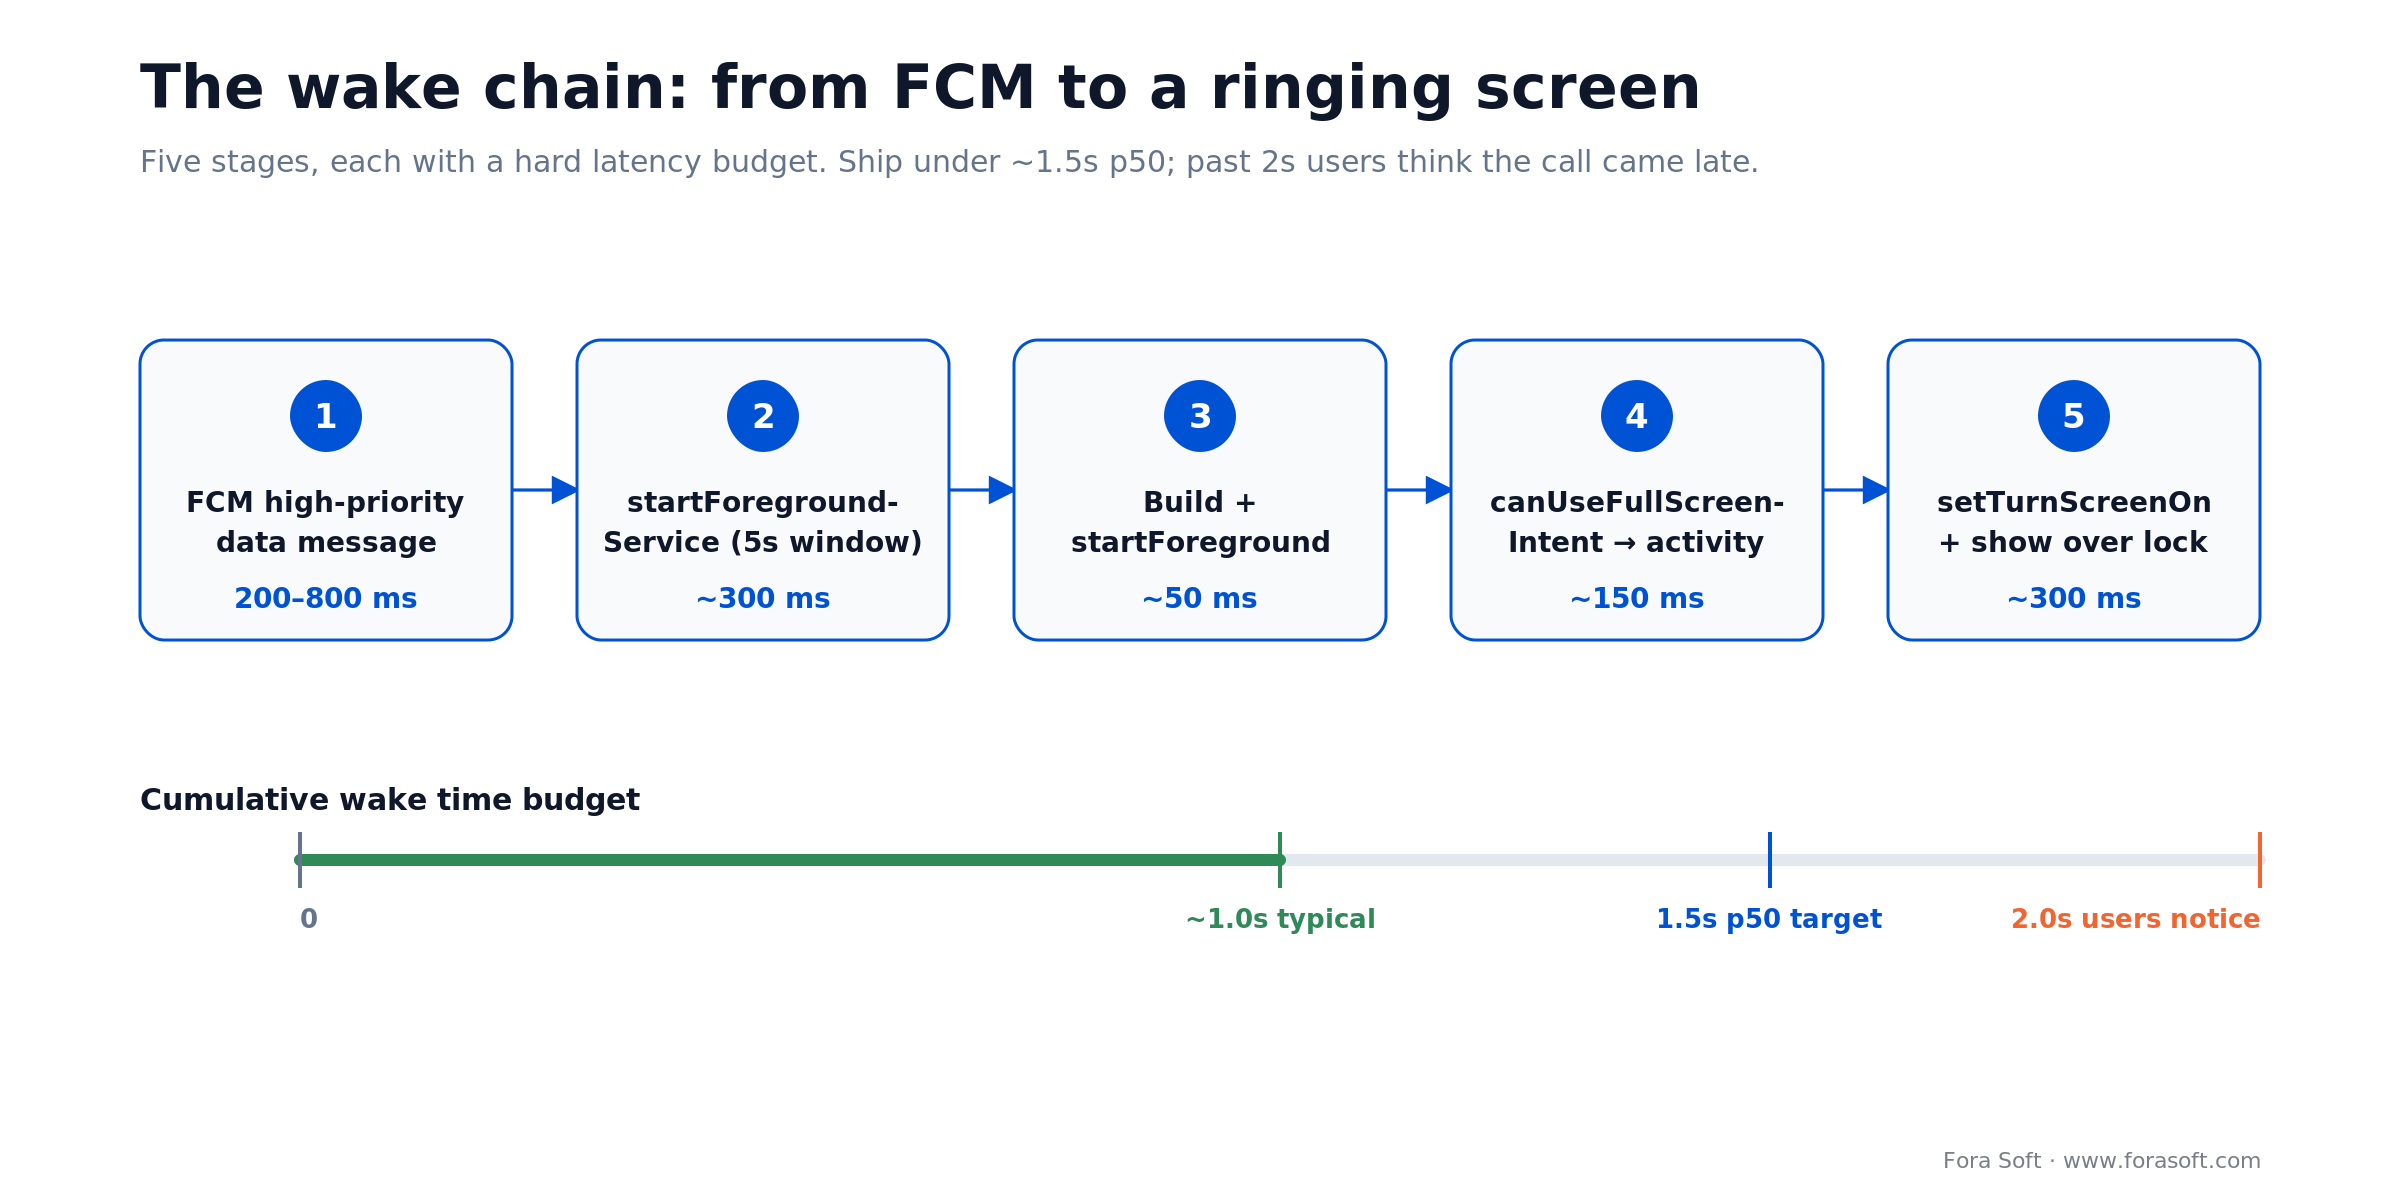
Figure 4. Five stages from FCM push to a ringing screen, each with a hard latency budget.
OEM survival: Xiaomi, Huawei, Samsung, Oppo, Vivo
Stock Android behaves. The aftermarket does not. Four of the top five Android OEMs ship a battery manager that terminates your foreground service unless the user explicitly whitelists the app. Across the calling products we ship, silent-kill rates run in the high single digits on Xiaomi HyperOS and Huawei EMUI versus under 1% on stock Pixel. The community-maintained dontkillmyapp.com tracks which vendors are worst and how each one behaves. The mitigation is part code, part UX.
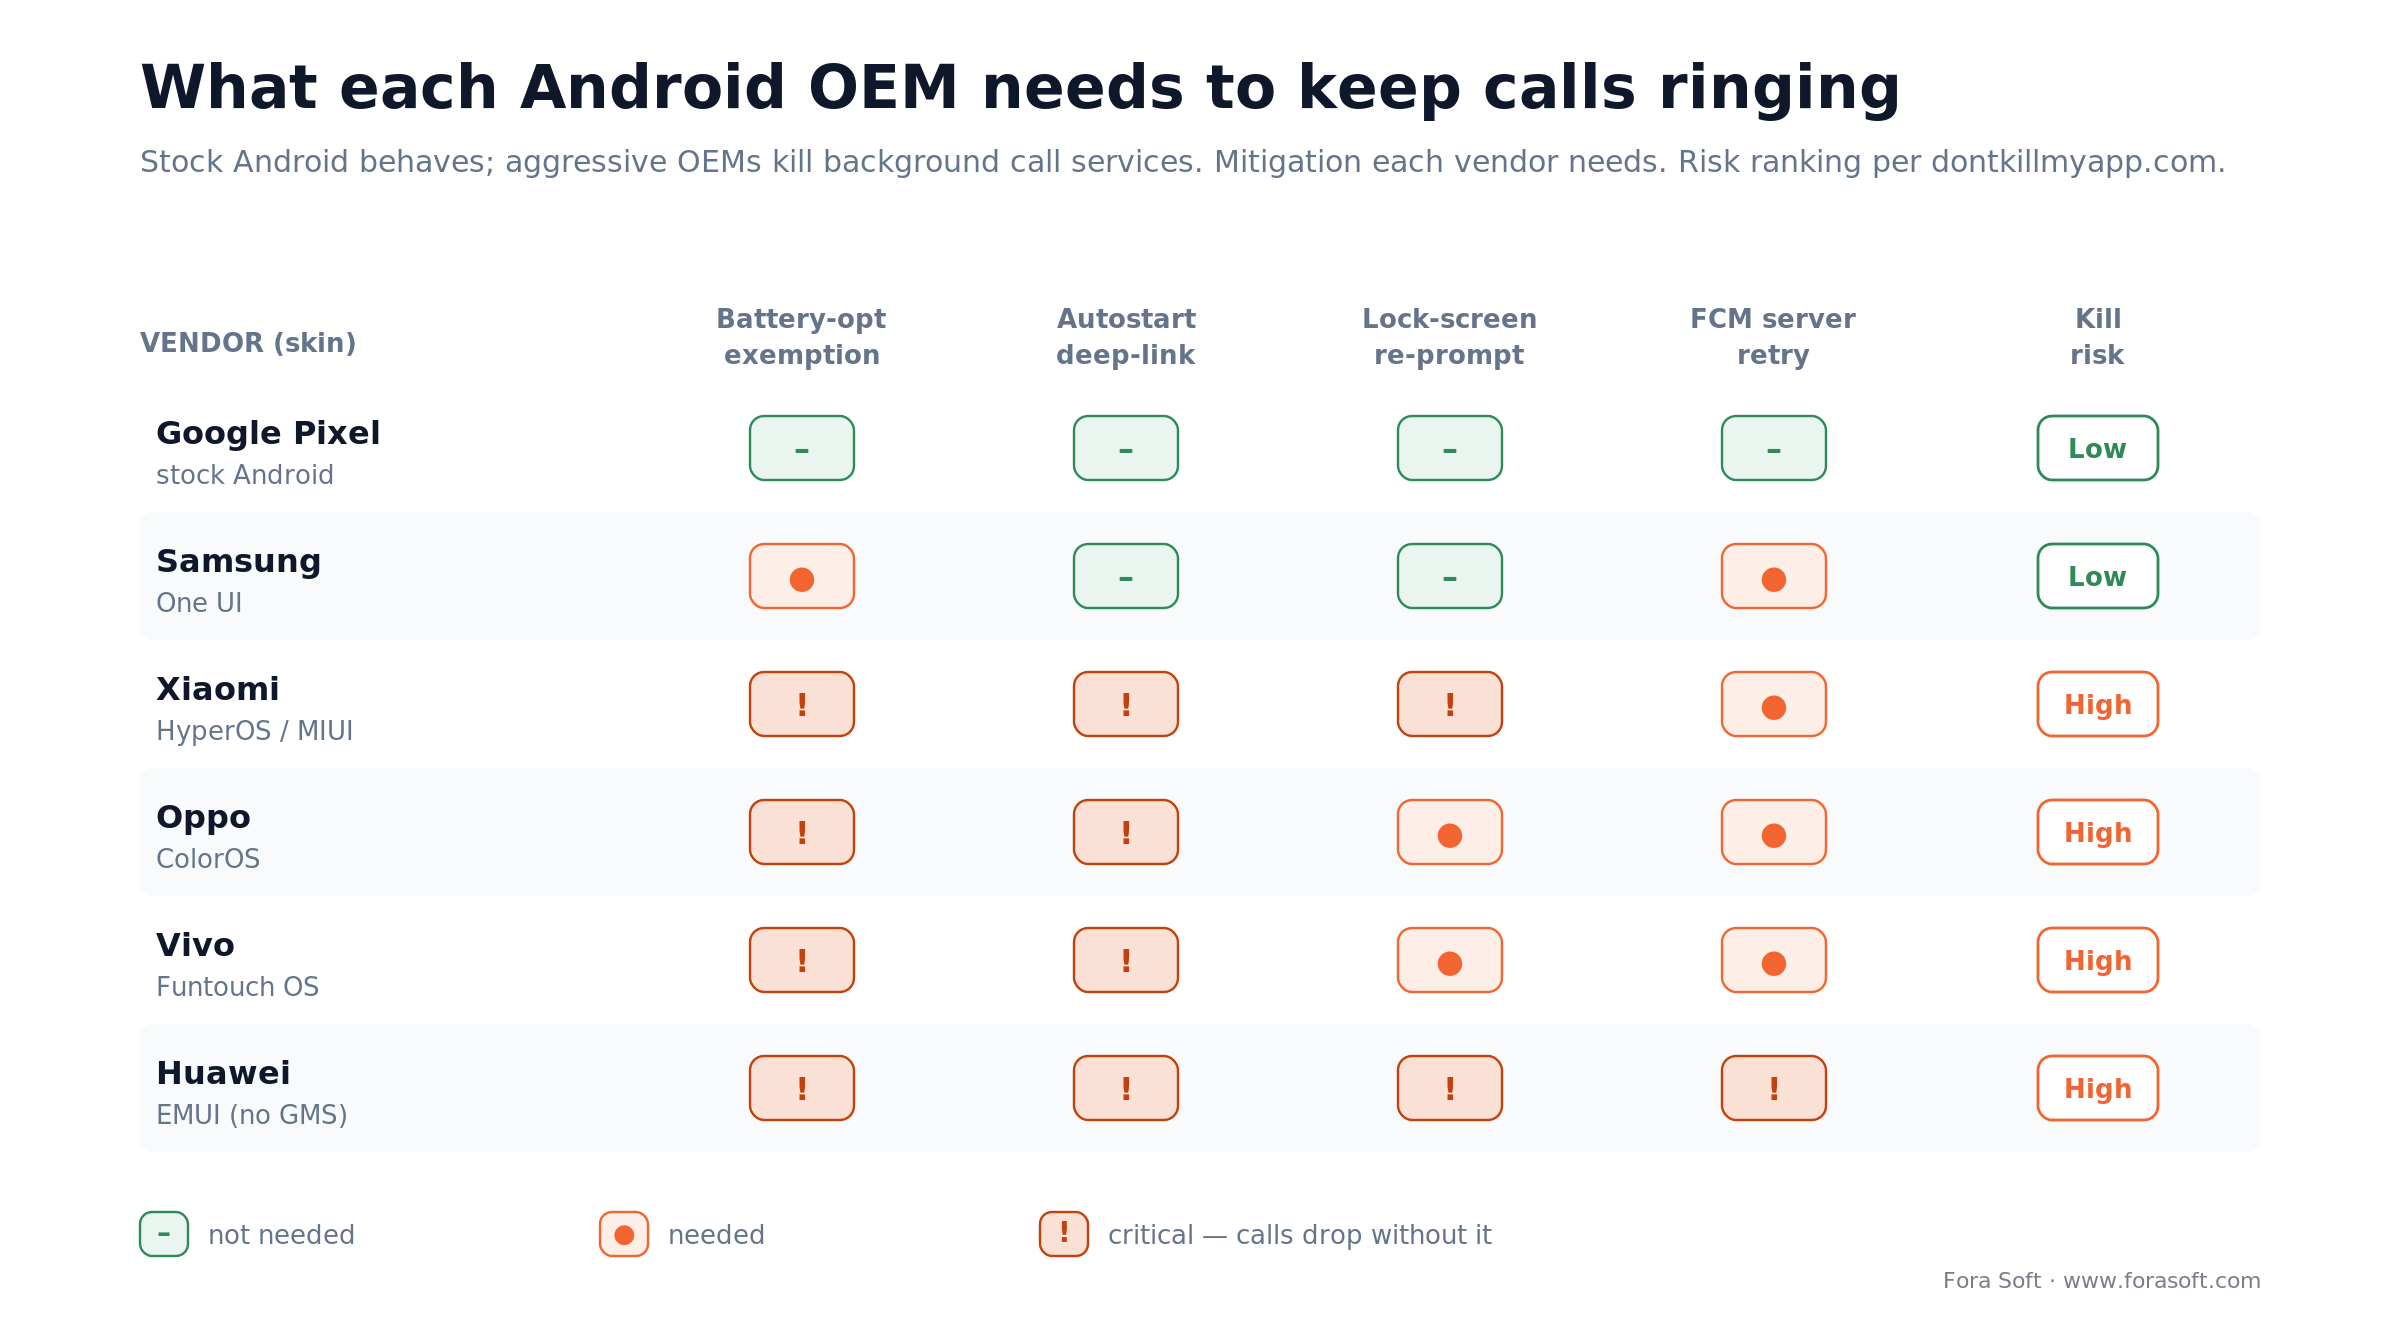
Figure 5. Stock Android behaves; four of the top five OEM skins need explicit survival work.
1. Battery-optimization exemption. Prompt the user via Settings.ACTION_REQUEST_IGNORE_BATTERY_OPTIMIZATIONS during onboarding. Google Play allows the request for calling apps only — gate by role.
2. Autostart deep-link. Xiaomi, Oppo and Vivo bury an “autostart” toggle that does not respond to any standard intent. Ship a settings-screen walkthrough with screenshots that deep-links to the OEM settings where possible, and falls through to copy instructions on the rest.
3. Lock-screen visibility. MIUI and HyperOS gate “show on lock screen” behind an extra permission that regresses on every OS update. A runtime check at app start that re-prompts after MIUI-side updates is the only reliable defense.
4. Cloud retry. A server-side answer-rate SLA that retries the FCM push after 3 seconds if the call has not been answered provides a second chance when the first push is dropped by the OEM.
5. Device matrix CI. Add the top 5 OEMs to your device-cloud test suite. Firebase Test Lab, BrowserStack, and Samsung Remote Test Lab together cover most of the matrix.
Mini case: raising answer rate 22 points on a telemedicine client
A US telemedicine client, one of the platforms similar to our MyOnCallDoc project, came to us after their Play Store rating slipped from 4.6 to 3.9 in six weeks. Users were writing one-star reviews with a single complaint: missed doctor calls. Their Android stack still targeted API 30, used a custom notification layout, and had no full-screen intent. Roughly 38% of calls went unanswered on first ring.
Our 3-week plan: migrate to API 34, swap the custom layout for CallStyle with full-screen intent, add the typed phone-call foreground service, add a rationale-first POST_NOTIFICATIONS prompt gated to sign-up day 2, and ship battery-optimization exemption during telemed onboarding. We also added an OEM detection layer that deep-linked Xiaomi and Oppo users into their autostart settings with a one-screen walkthrough.
Outcome after 30 days: answer rate lifted from 62% to 84%, weighted Play Store rating recovered to 4.5, and missed-call refunds dropped from $11k/mo to under $2k/mo. The engineering cost was seven Android-engineer weeks spread across 3 calendar weeks. Agentic engineering let our team automate the OEM-specific permission walkthroughs and reuse 60% of the testing scripts from our BrainCert LMS deliveries.
Five pitfalls we see in code review every week
1. PendingIntent flag mismatch. Teams migrate to API 31, forget FLAG_IMMUTABLE on one intent, and the app crashes the first time a notification is built. Grep the codebase for PendingIntent.get and audit every call; the fix is trivial but the bug is easy to miss.
2. Channel created once, never migrated. If you change the channel’s importance or sound later, Android ignores the change because the channel already exists. Users would have to clear app data to see it. Ship a new channel ID and delete the old channel with deleteNotificationChannel.
3. Full-screen intent requested on non-calling apps. A social app with occasional voice rooms asks for USE_FULL_SCREEN_INTENT and Play Console auto-revokes on the next release. The fix is either dropping the request or formally registering the app in a calling category at submission time.
4. Trampolining through a broadcast receiver. On API 31+, the answer button pipes through a receiver that then startActivity’s the call screen. Android silently drops the start and logs a warning. Target the activity directly from the action PendingIntent.
5. Ringtone played from USAGE_MEDIA. The wrong AudioAttributes usage keeps ringing when the user plugs in headphones, makes the ringtone too quiet in the car, and fails to duck properly during an active call. Use USAGE_NOTIFICATION_COMMUNICATION_REQUEST and CONTENT_TYPE_SONIFICATION.
KPIs: what to measure once notifications are shipped
Quality KPIs. End-to-end wake latency p50 under 1.5 s and p95 under 3 s, measured from FCM send time on the server to onCreate of IncomingCallActivity. Full-screen-intent-drop rate under 5% on API 34+. Channel importance audit: 100% of production devices on IMPORTANCE_HIGH.
Business KPIs. Answer rate by OEM (target >80% on all top-5 OEMs), missed-call refund rate (target <1% of sessions), and Play Store rating with “notification” or “call” in the review text.
Reliability KPIs. Foreground-service crash-free sessions >99.5%. ForegroundServiceDidNotStartInTimeException rate under 0.1%. Notification-permission grant rate target 70% by day 7.
A decision framework — pick the right stack in five questions
Q1. Is the app primarily a caller or messenger? Yes → request USE_FULL_SCREEN_INTENT and CallStyle. No → CallStyle only, skip FSI or Play will revoke it.
Q2. Do you need native call-log integration or Android Auto? Yes → layer ConnectionService on top. No → CallStyle is enough.
Q3. Is a missed call a revenue event? Yes → invest in OEM-specific survival (battery exemption, autostart deep-link, FCM retry). No → stock Android defaults are fine for the first six months.
Q4. Does your brand system require a custom notification UI? Yes → RemoteViews with DecoratedCustomViewStyle. No → CallStyle is cheaper and more consistent across OEMs.
Q5. Who owns the device matrix? Internal QA with Firebase Test Lab for core flows; external vendors (BrowserStack, Sauce Labs) for edge OEM coverage. Budget 15–20% of engineering time for OEM-specific work.
When NOT to build a custom call notification at all
Sometimes the right move is to not build the notification stack yourself. Three cases where hosted SDKs win.
First, if your product is call-adjacent rather than call-first — a team collaboration tool, a marketplace with occasional voice rooms — delegate to a hosted stack like Twilio, Agora, or LiveKit. You get their battle-tested Android SDK with CallKit integration already in place. Our guide to hiring LiveKit developers walks through the trade-offs.
Second, if you are an early-stage startup validating demand, default to CallStyle with no custom work; the time saved is better spent on signal quality and on your server-side signaling.
Third, if the calling feature is a two-week experiment rather than a product pillar, resist the urge to ship full-screen intents. The rollback cost when Play Policy catches up is higher than the six-week answer-rate gain.
The broader Android calling stack your product needs
A call notification is one component of a calling product. Four adjacent surfaces deserve the same treatment.
Reach for a partner when: the call stack is one milestone on a bigger roadmap and you’d rather not burn a sprint on OEM quirks. That is the core of our custom software development and real-time video & streaming work; the fundamentals live in our video streaming learn track.
Picture-in-picture so users can multitask mid-call without dropping. See our implementation guide on Picture-in-Picture mode on Android.
Screen sharing for calling products that double as collaboration tools — the Android screen-sharing implementation guide covers MediaProjection and foreground service types for capture.
Audio output switching between speaker, earpiece, and Bluetooth headsets is where the lion’s share of post-launch bug reports end up; our audio-routing deep-dive solves the common edge cases.
End-to-end architecture. Zooming out one level, the custom video conferencing architecture guide explains P2P / SFU / MCU trade-offs for calling products that scale past 1:1.
FAQ
Do you still need a custom layout with Notification.CallStyle?
For API 31+ the OS-rendered CallStyle covers the incoming-call UI on 90% of apps. You only need RemoteViews if you must support API 26–30 or your brand guidelines require colors and typography that the OEM template overrides.
Why is my full-screen intent silently not firing on Android 14?
Android 14 gates USE_FULL_SCREEN_INTENT behind a special app-access permission. Call NotificationManager.canUseFullScreenIntent(); if it returns false, deep-link to Settings.ACTION_MANAGE_APP_USE_FULL_SCREEN_INTENT. Google Play auto-revokes the permission from apps that are not registered as calling or alarm apps.
What minSdk should a 2026 calling app target?
API 26 (Android 8.0) is the pragmatic floor — it covers about 96% of active devices and is the first version where notification channels are mandatory. Target API 35+ (Android 15, required for new Play submissions since August 2025) and keep API 26 as the minimum.
How do you keep the call service alive through Doze and OEM battery managers?
Use a typed foreground service with FOREGROUND_SERVICE_TYPE_PHONE_CALL, prompt the user for battery-optimization exemption at onboarding, and add OEM-specific deep links to autostart settings for Xiaomi, Oppo, Vivo. Confirm with a post-install retention check at day 7.
Should my answer button target an Activity or a BroadcastReceiver?
Route the answer and decline buttons through a BroadcastReceiver so they run in milliseconds without pulling the user into the UI twice; the receiver flips call state and lets your already-showing full-screen activity take over. Do not have that receiver call startActivity itself — Android 12+ blocks background activity starts, which is why the full-screen intent uses PendingIntent.getActivity directly.
Can you show a call notification without the POST_NOTIFICATIONS permission?
No on Android 13+. The call notification will be built, posted, and discarded silently. A full-screen intent can still fire and wake the screen, but with no heads-up banner the user is likely to miss it. Always request the permission as part of onboarding before the first call attempt.
How long does a CallStyle notification ring before timing out?
The system does not impose a timeout on the notification itself. The system does not time out a phoneCall foreground service — only timed types such as shortService get an onTimeout() callback. You own the ring timeout: most production apps cancel the notification and call stopSelf() after a 30–45 second window aligned with their signaling server.
How much does custom Android call-notification work usually cost?
A clean CallStyle-first implementation on a healthy codebase is usually a 2–3 sprint scope: one sprint for the core stack, one for OEM survival and permission UX, a lighter sprint for QA across a 10-device matrix. Our agent-assisted engineering compresses the classic 6–8 week timeline on comparable work. For an accurate estimate on your specific codebase, a 30-minute scoping call is usually enough.
What to read next
Android services
Foreground services and deep links on Android 14
The background-service scaffolding every calling app needs, including typed service types and deep-link routing.
Android UX
Picture-in-Picture mode on Android with code examples
Keep users in the call while they multitask — the companion surface to call notifications.
Audio engineering
Audio output switching on Android during a call
Speaker, earpiece, Bluetooth — the routing problem that drives most post-launch bug reports.
Hiring
How to hire LiveKit developers in 2026
Skills, interview questions, and rate benchmarks for real-time voice and video specialists.
Architecture
Custom video conferencing architecture in 2026
P2P, SFU, MCU — the scaling trade-offs behind every calling product.
Ready to ship a call notification your users never miss?
A correct Android call notification in 2026 is Notification.CallStyle on API 31+ with a legacy fallback, a full-screen intent guarded by canUseFullScreenIntent, a typed phone-call foreground service, and a rationale-first permission flow for POST_NOTIFICATIONS. Everything else is refinement.
What separates a good implementation from a great one is OEM survival: battery-optimization exemptions, autostart deep-links, and a test matrix that includes Xiaomi, Samsung, Oppo, Vivo and Huawei. That work is unglamorous but it is where answer rates are won and lost. If you want a second pair of eyes on your stack, or a team that has shipped this pattern across 250+ products since 2005, we’re a 30-minute call away.
Need a calling app that answers every ring?
Tell us about your Android stack. We will return a punch list of CallStyle, foreground service, and OEM survival fixes inside a week.
.png)


